[Update 2: I’ve added estimates for February 2017!]
[Update: I’ve added estimates for October 2016, which have a chance of happening due to a big October storm]
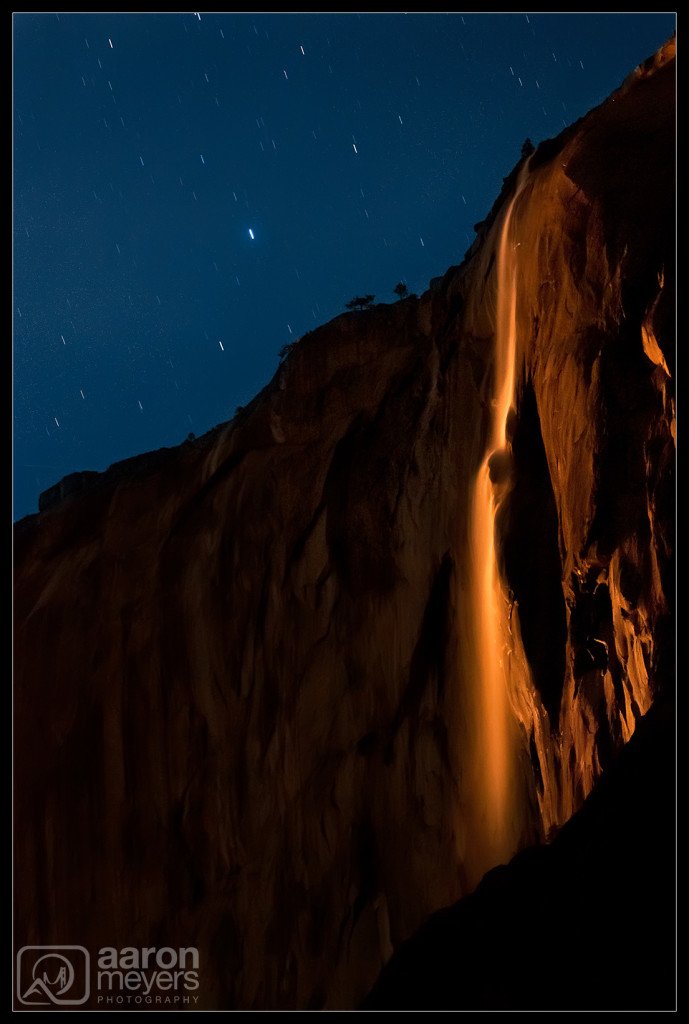
Each year thousands of photographers visit Yosemite National Park in hopes of seeing the famous ”Fire Falls” event at Horsetail Falls. Horsetail Falls is a seasonal waterfall that only flows after rain or as the snow melts above El Capitan. It’s located on the west side of El Capitan and can be viewed from a number of locations. This event occurs when the sun is in just the right spot to reflect off the granite behind the waterfall and cause it to light up. The sun also needs to be close to the horizon to give off its orange light and thus turn the waterfall orange. It’s amazing how much like fire and lava the water becomes! The event starts around Valentines Day each year and continues for about 2 weeks.

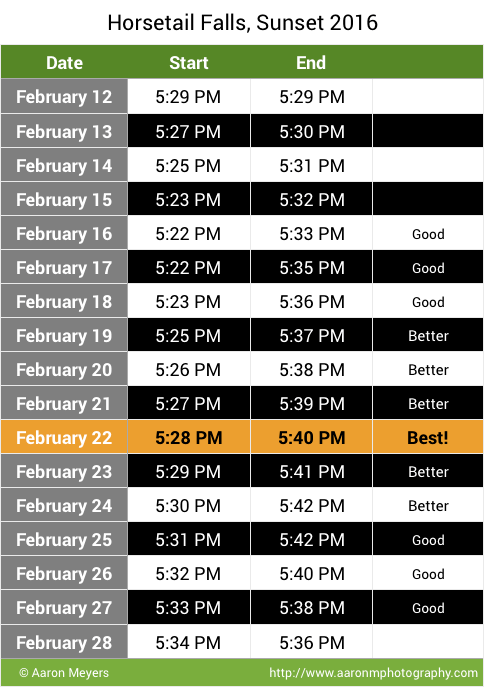
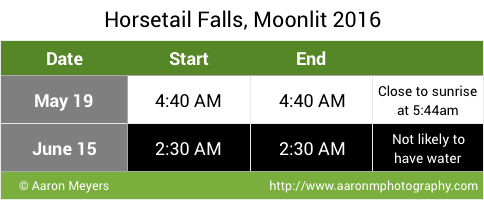
Everyone always asks me when the best time to view the Horsetail Fire Falls will be, and more importantly, when to photograph it. Each year I calculate when this will happen and here’s the breakdown for 2016. For those of that are savvy and know that this also occurs from the moon, I’ve included the moonlit times as well.
As a reminder:
- There needs to be water in the waterfall. The early snow we’ve had through December makes things hopeful. The drought’s from the past few years nullified any chance lately. Let’s pray the rain/snow continues.
- There needs to be a clear night where the clouds to the west won’t block the sun from hitting the waterfall.
- Arrive early as there will be many people in the park and parking spots are limited.
Sunset for 2016:

Moonlit for 2016:
Moonlit is a bit more complicated because there’s a number of factors at play: the moon needs to be large (mostly full), there needs to be no clouds, and the sun has to be far enough below the horizon that it doesn’t wash out the stars.

Where to See/Photograph Horsetail Falls:
There are 3 popular locations (click the link for Google Maps and GPS coordinates) that can be easily accessed to view and photograph Horsetail Falls on fire.

1) El Capitan picnic area (on Northside Drive). This is the most popular (click to see Michael Chang’s photo) and most crowded view of Horsetail Falls. This is where Galen Rowell took his famous ”Natural Firefall” photo. This location provides the closest view, but it’s further east and a harsher angle and is better in late February (perhaps the last week of the Fire Falls as the sunset moves east). You can get some great photos from here but it is recommended to go further east during the early week of the Fire Falls and to hit this spot at a later week. Parking fills up really quickly (the lot was full by 2pm) so get here early!
GPS Coordinates: 37° 43’ 41.82”, -119° 37’ 13.62”
2) Southside Drive, West. This provides the best angle to see the actual waterfalls but from this angle the falls won’t appear to be on fire (see Eloine Chapman’s photo here). The granite rock lights up with a glorious orange glow but it may be disappointing if you’re expecting Fire Falls. I prefer the other 2 shooting locations to this one. There is a parking lot here and then a small hill to walk down.
GPS Coordinates: 37° 43’ 23.30”, -119° 37’ 17.56” (Park at: 37° 43’ 22.11”, -119° 37’ 12.73”)
3) Southside Drive, East. This is the location where my photo above was taken. This angle is a bit further south east than the Picnic Grounds so you’ll need a slightly longer lens (as you can see, 200mm was enough) but allows you to capture El Capitan and the falls at the same time. This viewing spot also gives you an angle to see the trees and snow above the falls. There’s a small turn-out on both sides of the road just before this spot that can handle about 10 cars. Plan on arriving by 2:30pm if you want a spot. The rangers have been known to swing by this location about 5 minutes before the falls turn on fire and give anyone parked on the road a $300 ticket (so get here early and claim your spot in the pull-out area)!
GPS Coordinates: 37° 43’ 39.84”, -119° 36’ 33.06” (Park at: 37° 43’ 36.74”, -119° 36’ 33.06”)
What to Bring:
- Your camera (obviously), preferably an SLR, but a point-and-shoot with a longer zoom will work too.
- A telephoto lens (100-200mm lens is enough. Full Frame cameras may want a 300mm lens).
- A sturdy tripod (I used a crappy tripod and had some small shake from the heavy lens).
- Cable release/remote control shutter (to avoid camera shake).
- Warm clothes (layers, gloves, hat, sweatshirt, jacket, etc).
- Flashlight (for after sunset).
- Lawn chair (to sit on while you wait for sunset).
- Snacks/Food/Water.
Recommended Settings:
- Mode: Aperture Priority (you have a tripod to allow for slow shutter speeds and you want to make sure you have a good depth of field).
- Aperture: Use the sharpest aperture for your lens (typically around f/8). Once you have a couple good shots you can start to play around with other apertures.
- Focal Length: A focal length of about 100-150 should be enough (150-225mm on a full frame dSLR).
- ISO: Lowest ”standard” ISO, to ensure the least amount of noise.
- White Balance: Auto White-Balance. You’ll probably warm it up in post-processing.
- Focus: Manual focus with Live-View (if available). Many photographers had trouble getting clear shots because autofocus couldn’t be obtained or it focused on the mist and not on the rocks. Turn on manual focus and image stabilization (vibration reduction on Nikon), zoom as far in as you can on live view, and manually adjust the focus until it is sharpest then turn-off image stabilization and LiveView.
- Shutter: use a remote shutter release. It will decrease the chance of motion blur.
- Mirror-Lockup: If you need to, use mirror-lockup to reduce motion blur. I had a crappy tripod and this was needed to get better shots.
- Exposure Compensation: Under expose your photo. The falls are really bright and can cause a slightly overexposed photo if shooting in Matrix Metering. I found a darker image with dark granite looked best and you’ll also get a faster shutter speed and thus sharper photo.
- Use 14-bit RAW images if you have the option. Don’t shoot in JPEG.
Tips for Shooting Horsetail Falls:
- Scope out the locations before hand and choose your favorite spot.
- The sunset starts out on the west side of the rocks during early February and progressively moves east (from left to right in the photos). If you want to see the falls all lit up in the early ”Fire Falls” season, go further east. As the sunset moves east you can move east (towards picnic grounds) to get good shots. See Steve Thuman’s shot for an example of going too early in February.
- You need to shoot this at an angle to get the falls on fire. The “Fire Falls” effect is created because the granite rocks face east/west and happens to reflect the February sunset. This reflection then backlights the waterfalls. Too much water and it blocks the sunset from hitting the falls. Too far west and you aren’t at an angle to see the sunset reflecting off the rocks onto the water.
- Get there early! People started showing up at the picnic grounds by 2pm and at the Southside Dr location by 2:30. Parking is limited and you can get a $300 ticket for parking on the street!
- Don’t get stressed if you do not see much water on the falls. The mist will light up beautifully. In fact, from the picnic grounds we couldn’t see any water but they still got a great Fire Falls!
- Re-adjust your focus a couple minutes before sunset is supposed to start. The dropping temperatures will change your focus.
- A really sturdy tripod is recommended. Add some weight under the center column if you can. Shutter speeds will be less than a 10th of a second and even the slightest movement can ruin your shots.
- An L bracket on your tripod can be handy for stabilization when shooting in portrait orientation. Some lenses have a slip ring that can rotate 90º to allow you to do this without an L bracket (for example both Canon/Nikon’s 70-200mm f/2.8 lenses do this).
- You do not need a polarizer. The light is soft and the polarizer didn’t do anything to enhance the photo.
- Take a couple practice shots before hand so you can figure out your settings and make sure everything is super sharp.
- The snow/ice that you’re standing on can be really slippery when the sun sets. There are lot of dried pine-needles on the ground so take a bunch and put it on the ground below you to provide some extra traction.
- Be patient! You’ll be sitting outside for a while so make friends with the other photographers, ask em for tips, and just have fun!
